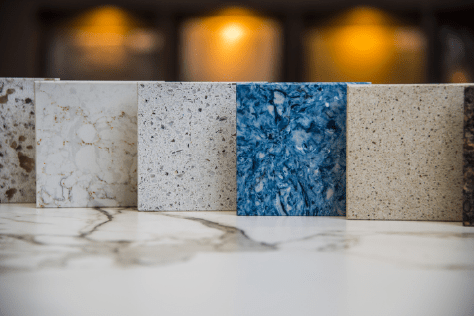
PrimeCore Quartz Surfaces are ideal for a wide range of interior residential and commercial applications, including: vanities, reception counters, bar tops, kitchen countertops, bathrooms and furniture. PrimeCore Quartz Surfaces are not suitable for exterior use or in areas exposed to UV radiation or excessive heat. PrimeCore Quartz Surfaces are manufactured in a wide range of colors, divided into several series with unique characteristics. PrimeCore Quartz Surfaces are manufactured from up to 88% quartz (one of nature’s hardest minerals) and high quality polymer resins and pigments, which are compacted under intense vibration, vacuum and pressure into dense, non-porous slabs. The quartz sheets are then post-cured, cut to various thicknesses and finally polished.

Quartz surfaces are perfect for all sorts of interior spaces, whether it’s for a kitchen countertop, bathroom, bar top, vanity, reception counter, or furniture. They’re ideal for commercial and residential applications
We understand that quartz surfaces are not suitable for exterior use or in areas that are exposed to UV radiation or excessive heat.
Quartz surfaces come in a beautiful range of colors. They are divided into several series, each with its own special properties.
Quartz surfaces are made from a blend of natural beauty and modern engineering. They’re crafted with up to 90% quartz, one of nature’s hardest minerals, and high-quality polymer resins and pigments. These ingredients are artfully combined and compacted under intense vibration, vacuum, and pressure, resulting in beautiful, dense, non-porous slabs. Then, our quartz slabs are lovingly post-cured, carefully gauged to various thicknesses, and polished to perfection.
Safety Guidelines
We recommend using ground fault circuit interrupters (GFCIs) in areas where there is water or moisture. I’m so excited to find out where we’re going!
To keep you safe and healthy, please use wet tools to cut the material and wear a mask. This will help reduce the amount of airborne particles you inhale.
Please make sure to keep children and visitors at a safe distance from the work area.
We’ve got you covered with a childproof workshop! We’ll use padlocks, master switches, or we can remove starter keys.


Hey, just a friendly reminder to use the right tools as they were designed! We kindly ask that you wear proper apparel for work areas. We recommend wearing hair-protective styles to keep your hair safe and sound!
I’m here to help you with your hair, whether it’s long or short! To keep you safe and sound, please wear ear and nose protectors, and safety shoes.
We kindly ask that you wear approved protective eyewear. If you need to, go ahead and use a clamp or a vise to hold your work in place.
You’ll be glad to know that you’ll have both hands free to safely operate tools.
Don’t worry about going too far. Just remember to keep your footing and balance, and you’ll be all set!
We’re here to help you keep your tools in top condition! If you keep your tools sharp and clean, you’ll get the best and safest performance.
- We all know how important it is to keep our workspace clean and tidy. It’s also a good idea to regularly check on housekeeping to make sure everything is tidy and safe.
- Make sure it’s well ventilated!
- We kindly ask that only authorized personnel enter.
- We kindly ask that you restrict the work area to authorized workers and personnel only.
- Just be careful not to overreach. Just remember to keep your footing and balance, and you’ll be all set!
- We kindly ask that you always have a fully equipped first-aid kit on hand, with everything you need to handle any tasks you’re doing on site.
- Please, take a moment to read the instruction manuals for the tools you’ll be using. We’ll teach you everything you need to know about using the tools safely and effectively.
- We kindly ask you to use the right tools for the job.
- We recommend that you use the appropriate tools and attachments, as suggested by the manufacturer. Please be sure to use the right tool or attachment for the job. Using the wrong tool or attachment can be dangerous and can lead to accidents. Please, please don’t use any improvised tools.
- MAINTAIN TOOLS
- It’s so important to keep all tools in good working order and to test or service them according to the manufacturer’s recommendations.
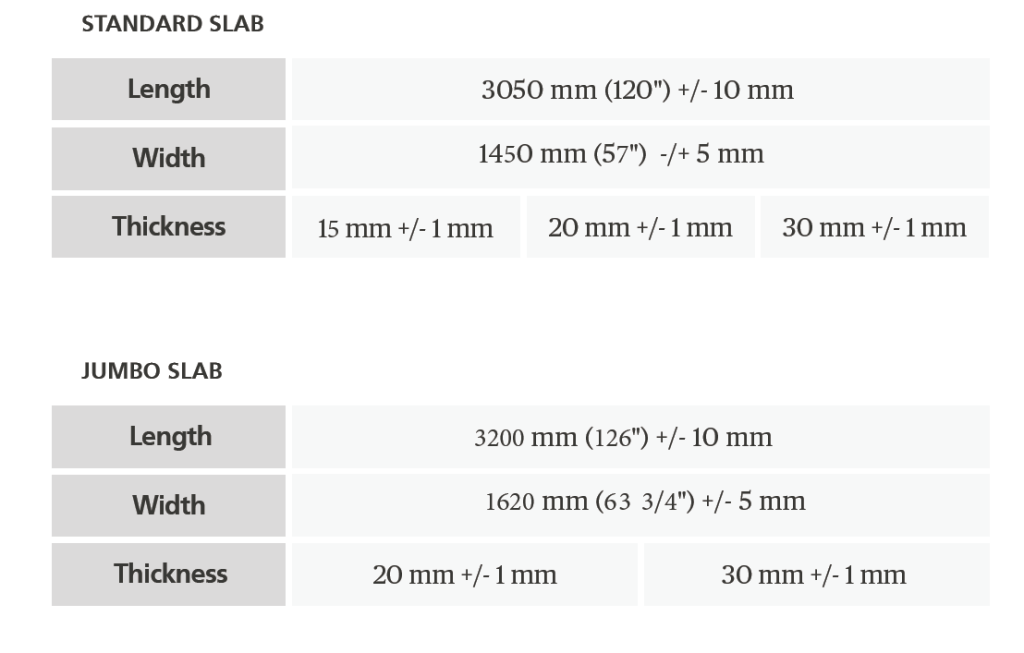
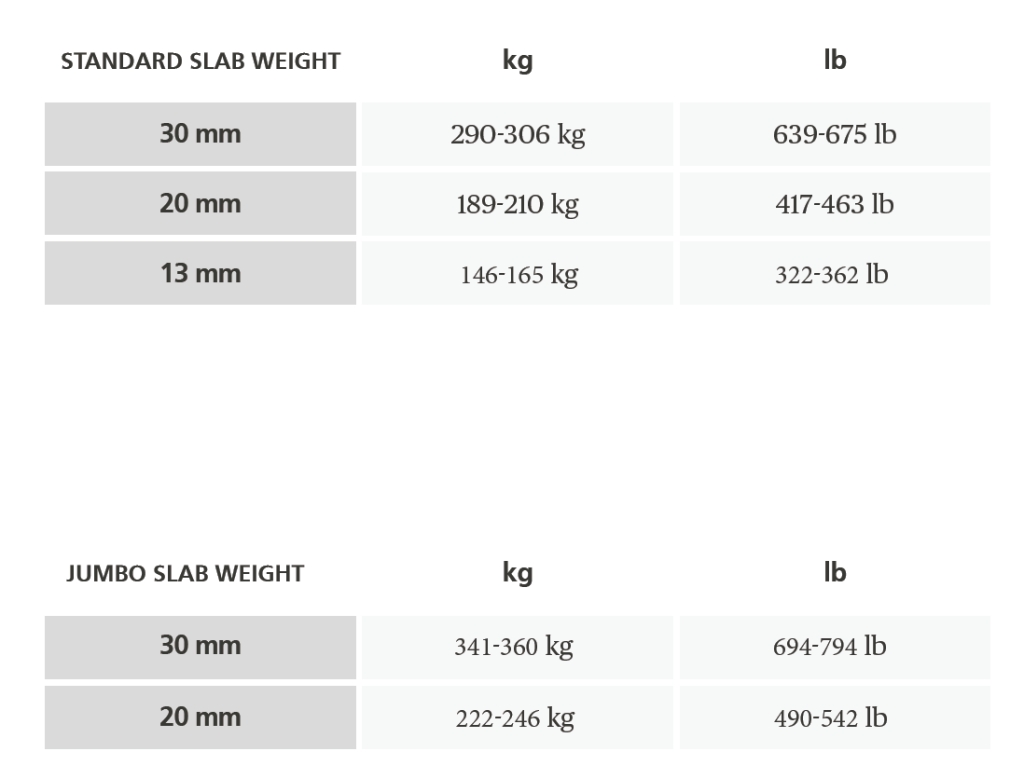
Slab Information
The data here is only nominal, which means it’s stored and used in a specific way.
We just want to make sure you have the best experience possible, so we’ve made sure to include transportation purposes.
Handling,
Transportation & Storage
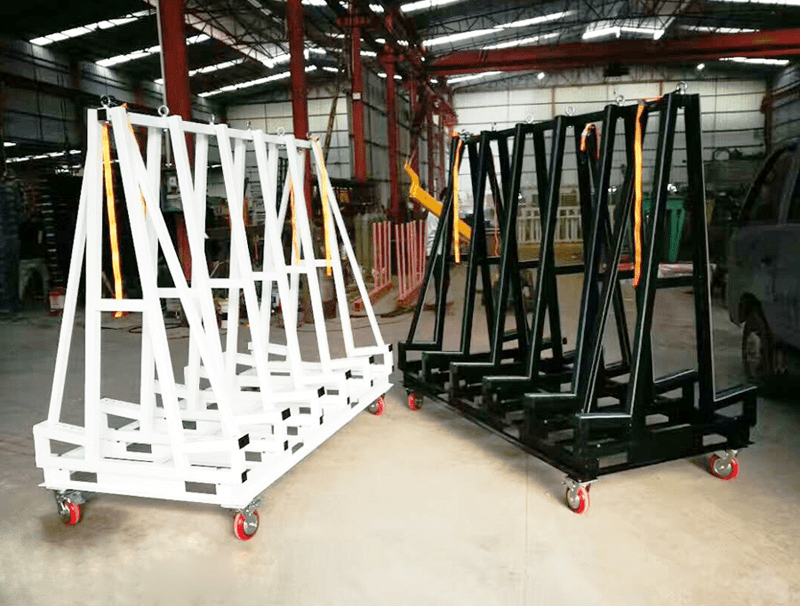
- We’re here to make sure that, no matter what stage you’re at with your slabs, whether it’s handling, transportation, or storage, you can rest assured that we’re taking the utmost care of them.
- Go for a balanced center of gravity.
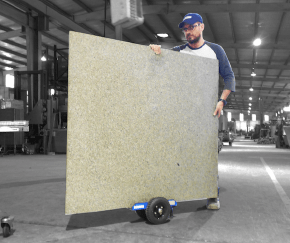
- It’s so important to remember that slabs need to be loaded and unloaded.
- Use a forklift, bridge crane, or something similar to get heavy things moving.

Transportation
- Quartz slabs can be pretty heavy — we’re talking over 200 kg (440 lb) each! All vehicles transporting
- We want to make sure your quartz slabs are designed to be strong and sturdy, so they can hold up to the weight without any problems.
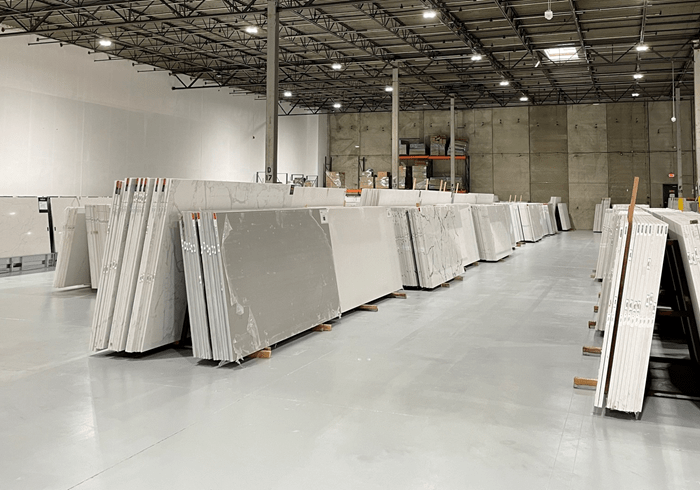
Storage
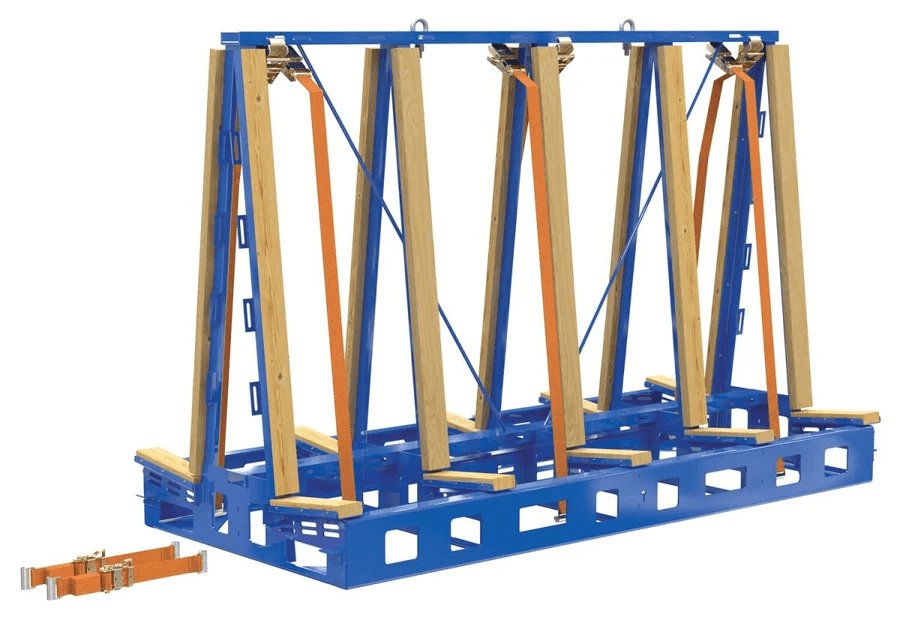
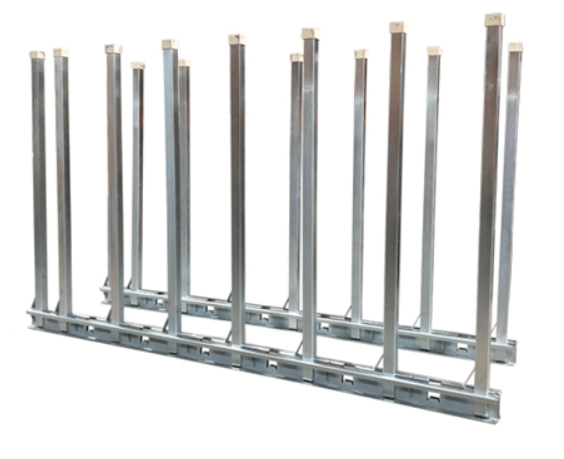
When you’re storing your slabs, be sure to keep them from warping. Go ahead and use at least two support beams to hold the slabs in place. Have the slabs placed vertically on an H frame. Go ahead and place no more than 20 slabs on each rack, and make sure to arrange them so their faces are facing each other and they’re placed back-to-back. It’s also a good idea to keep slabs bound with straps at all times. This helps to keep them from expanding and maintaining their flatness.
Make sure to fasten slabs with straps right before they’re ready to go. As time goes on, the resin will harden and keep its shape and flatness. So, it’s really important to keep it secured at the beginning to avoid any warping later on. I’m sending you a picture to help explain what I mean.
It’s best to store polished slabs indoors to protect them from the sun’s rays, which can over time cause damage to the slabs. You don’t have to store the slabs in a shaded area, but it’s a good idea to keep the last slabs in each rack facing out. Just a friendly reminder to keep your storage temperatures below 135°F.
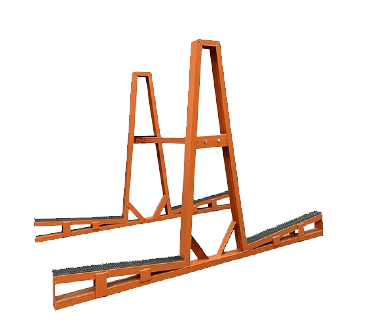
Storage on A-Frames
You can safely contain slabs between the uprights of A-frames. I know this isn’t the best situation, but it’s definitely safer than open-ended A-frames. It’s best to use it only as a temporary storage solution.
Color Matching
Because of Quartz’s complex blend of natural minerals, it’s always a good idea to check slabs for color variations that may arise from different production cycles. Here are some tips to help you get started:
Go ahead and complete the jobs from the same batch number. Just take a moment to check that the colors are all consistent. Since each slab is made up of 90% natural quartz, each one is one-of-a-kind. That’s why it’s so important to check each slab for shade and quartz distribution.
It’s always a good idea to do a visual color match under similar lighting conditions as found at the job site before cutting. We would love for you to enjoy your experience with our products, but we do not recommend mixing different batch numbers.
If you can, try to use slabs from the same batch for each job. This should ensure a color match. But don’t worry! Just do a quick visual color match before cutting to make sure the shading is consistent.
Quartz Pattern Irregularities
Quartz displays a lovely, random distribution throughout each slab. If there’s any obvious irregular distribution of particles in the slab, the fabricator will need to check if the slab is suitable. If it doesn’t work out, no worries! Just exchange it before you cut it.


Tools and Machinery
- Shaped grinding wheel
- Pneumatic polisher
- Diamond contour blades
- Heavy duty electric/pneumatic angle grinder for cutting or grinding (variable speed preferred)
- Light electric/pneumatic angle grinder for polishing (variable speed preferred)
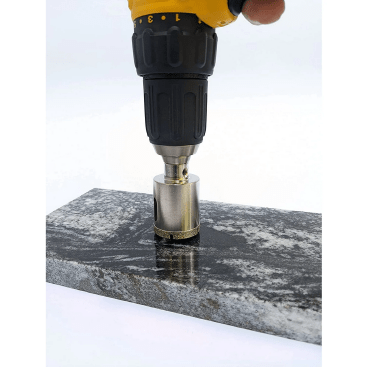
- Diamond core bits in various diameters Diamond grinding wheel
- Diamond cutting disks in various sizes
- Wet edge profiling machine (edge router) Electric hand drill (variable speed preferred) Carbide-tipped drill bits
- Polishing drums for polishing inside corners Sets of diamond and sanding polishing pads Diamond polishing brushes (see section 8.5.3) Clamps in various sizes
- Grinding stone
- Pneumatic seam setter
While a sample is a great way to get a feel for the look and feel of the slab, it’s important to remember that it’s just a sample. It’s not a complete indicator of the overall effect of the full-size slab.
Let’s make sure we’re on the same page with our client.
We always suggest that you take a look at the full slab image, or even the actual slab if you can, before we start working on your project. This will help make sure that everything meets your expectations and that there are no problems when it’s time to install it. Our website visualizer is here to help! It allows customers like you to view full slabs, so you can get a good idea of what you’re getting.
Installation Accessories
- Seaming clamps
- Vacuum cleaner with (HEPA) filter for dust collection tools
- Spatula and scraper
- Dust collection installation tools
- Cleaning materials
- Pigments (for tinting seam adhesive)
Adhesives
The color-matched adhesive may still need to be adjusted because there may be minor differences between different batches of quartz slabs.
You can make the color-matched adhesive even better by adding transparent adhesive to it.
The color of the glue must match the color of the surface so that the seam is barely visible. If you don’t have pre-colored matching adhesive, mix the color paste pigments with the adhesive.
When mixing the adhesive to match the color of the surface, keep in mind that the color may look slightly lighter after it dries.
To attach quartz to another material, use a flexible glue like 100% silicone or polyurethane-based glue that can be used on both quartz and the other material.
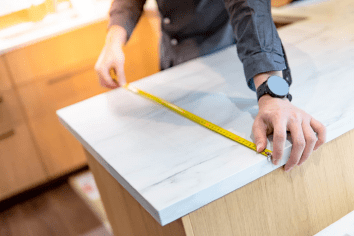
Measuring
Mark on the cabinets where the seams will be made on the surface.
Make a solid template or frame template for each piece of the surface, as described below.
Mark the center point of items to be installed on the surface, such as sinks and cooktops/hobs, on the template.
Look at the location and the space available for items to be installed on the surface. Think about the relation between the items and the surrounding area. For example, a cooktop/hob centered underneath a vent; a sink centered underneath a window.
Mark on the template any information needed for making the product, such as which edges need to be polished or which edges are next to each other.
Take some measurements to confirm the angles, dimensions, and arrangement of the cut pieces later in the workshop.
Constructing a Frame Template
- Make a frame template out of a light, stable, rigid material. You can use plastic strips that are about 70-100 mm (2¾-4″) wide and 3-4 mm (⅛”) thick.
- Place position length strips along the length of the surface piece, including overhangs and space allowed for gaps around the edge. Match the ends of the length strip with the seams that are marked on the cabinet.
- Glue plastic width strips about every 300 to 400 millimeters (12 to 16 inches) across the width of the template with a fast-drying glue. Match the two end width strips with the seams that are marked on the cabinet.
Measuring by Dimension
Make a clear diagram to record the measurements. You can use a computer or a professional drawing board with a ruler.
Use the front line of the installation as the central line of the diagram. Use this line to draw all other measurements. If the front line isn’t straight, create a straight line on the cabinet to use as
The central line.
Mark the center point of items to be installed in the countertop, such as sinks and cooktops/hobs, on the diagram.
Make sure that the total length of the dimensions that make up one side is the same as the length of the whole side.
Don’t think that corners are exact 90° angles. Use a ruler to measure the sides or an angle measure to make sure you get the right angle. If you make a 1° change to a 90° angle, you’ll get a 52 mm change for every 3 m (2″ for every 118″).

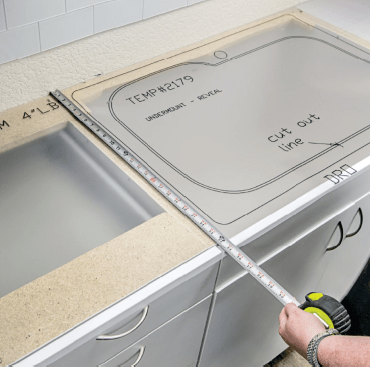
Measuring Using Digital Devices
You can make advanced electronic measurements that create a CAD file using different technologies. These are very useful for people who use CAD files for automated equipment like CNC machines and water jet cutting.

Only people who have been trained to use the equipment should use it. Be sure to check several dimensions manually to make sure the equipment is working correctly.
All important points must be recorded to allow the equipment to create an accurate file. The trained operator must add details such as overhangs, radiuses, sink locations, etc. The finished edges must be marked and defined.
These units are usually accurate to within 2 mm (1/16″), but someone with knowledge of installation challenges needs to be present on site.
Fabrication
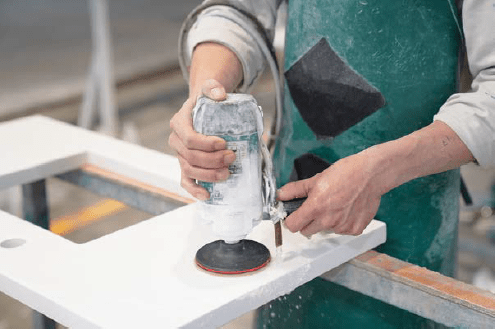
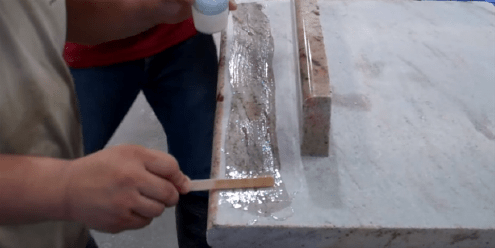
- To prevent overheating and dust, use only tools with water cooling for cutting, drilling, and polishing.
- If quartz is dry cut, the heat will change its physical properties and make it more likely to crack, chip, or discolor.

